Java 框架的使用
在这里告诉你一些技巧,宝贵的经验应该遵循
配置
以下是应用的基本配置,具体为:
这里给出基本的应用配置,详见应用配置文件
应知应会
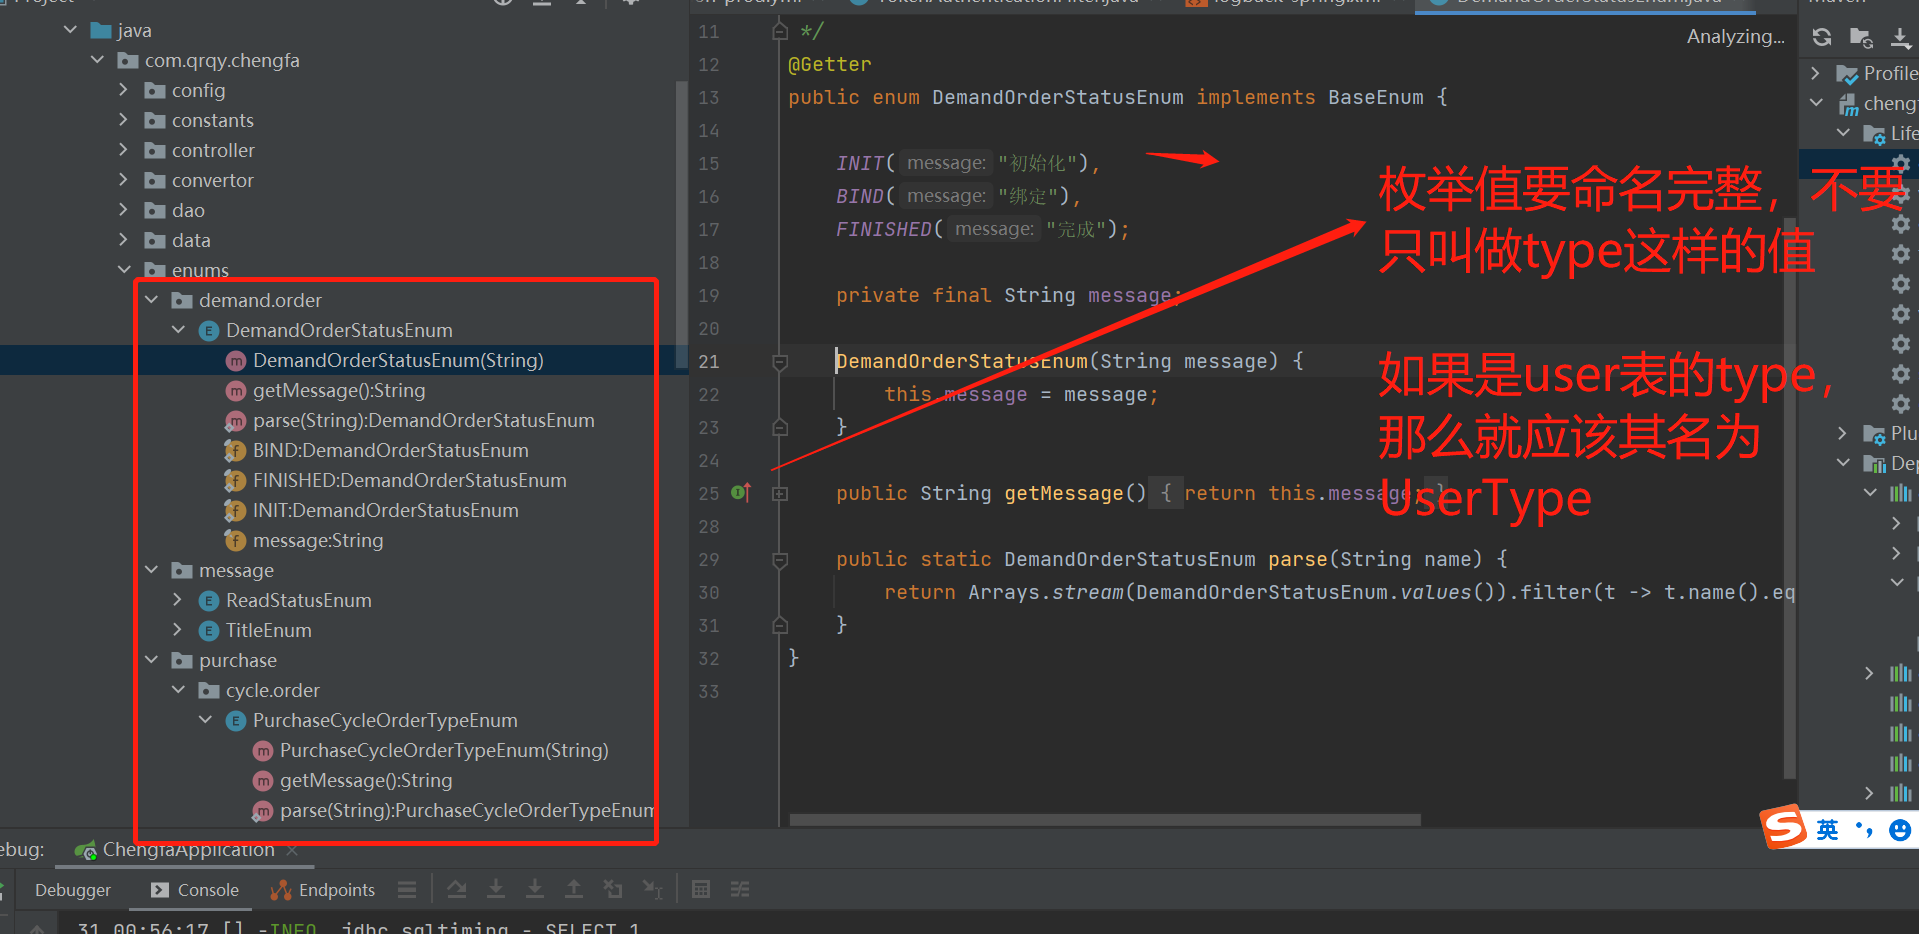
枚举的管理
枚举值应该放在哪里?
就像 dao 和 repository 一样,枚举值应该放在 enums 包下,统一管理
我的项目名如何修改
在模板项目中 模板项目 中,默认的包名是 demo,一般情况下需要调整为您的项目名,修改后,要注意 Application 一些配置的调整
请注意下面的 basePackages 等,需要调整为和项目一样,例如 Entity、Manager、Controller 的扫描等
@EnableScheduling
@SpringBootApplication(scanBasePackages = {"com.qrqy"})
@EntityScan(basePackages = {"com.qrqy.crawler.dao.entity"})
@EnableJpaRepositories(
        basePackages = {"com.qrqy.crawler.dao.repository"},
        repositoryFactoryBeanClass = BaseSqlRepositoryFactoryBean.class
)
@EnableJpaAuditing
@EnableAspectJAutoProxy(proxyTargetClass = true)
@RestControllerAdvice(basePackages = {"com.qryq.crawler.controller"})
public class CrawlerApplication {

    public static void main(String[] args) {
        SpringApplication.run(CrawlerApplication.class, args);
    }

}
Service 层的参数校验
请注意,除了 Controller 中有参数校验的要求外,Service 层原则上也要有参数校验,那么提供了 ValidatorHelper 用于参数校验
    @Resource
    private ValidatorHelper validatorHelper;
使用时,在 Dto、Bo 中可以为字段增加@NotNull、@NotEmpty 的注解
@Data
public class UserRegisterDo implements Serializable {

    private static final long serialVersionUID = 5900096730059591927L;
    /**
     * 用户类型
     */
    @NotNull(message = "type不能为null")
    private UserTypeEnum type;
    /**
     * 昵称
     */
    private String nickName;
    /**
     * 真实名称
     */
    @NotEmpty(message = "realName不能为空")
    private String realName;

    /**
     * 手机号
     */
    @NotEmpty(message = "phoneNumber不能为空")
    private String phoneNumber;
    /**
     * 头像图片
     */
    private String avatar;
    /**
     * 账号名
     */
    //fixme 请注意,不要删除accountName
    @NotEmpty(message = "accountName不能为空")
    private String accountName;

    /**
     * md5加密密码
     */
    @NotEmpty(message = "md5Password不能为空")
    private String md5Password;

    /**
     * 性别
     */
    private GenderEnum gender;

}
然后需要显示的调用一下 validatorHelper.validate()方法,其中返回值为 Pair
        Pair<Boolean, String> pair = validatorHelper.validate(userRegisterDo);
        if (!pair.getFirst()) {
            throw new BizException(CommonResponseCode.PARAMS_ERROR, pair.getSecond());
        }
自定义注解
首先,在 3.0.12 前,各个 OSS 配置必须在 yum 文件中,框架方可启动,这个设定是不正确的,在 3.0.12 后,如果不使用 OSS,可以不配置 yum 文件。如果需要使用,则可以在 yum 中设置如下 OSS 的配置:
# 对象存储
ali:
  oss:
    endpoint: oss-cn-shanghai.aliyuncs.com
    accessKeyId: LTAIa0lirGM
    accessKeySecret: WCLbsOeCToDew2KPS9JsqXm
    publicBucket: cv-public
    privateBucket: cv-private
tencent:
  cos:
    #endpoint: cos.ap-beijing.myqcloud.com
    secretId: AKIDb090E82f16uSjjSu50e
    secretKey: PYR4QVKs9ByUkJbdOs52j9I
    region: ap-beijing
    publicBucket: ibd-avatar-1257584888
    privateBucket: ibd-file-1257584888
qiniu:
  kodo:
    accessKey: JXanCoTnA8JmWooPTqvK5RCHXb
    secretKey: ouc-dLEY42KijQ1mKk_M_3vNpmT
    publicDomain: ytcf.public.isart.me
    privateDomain: ytcf.public.isart.me
    region: qiniu.region.z1
在框架项目中,自定义了一些注解可以使用,在 HttpMessageConvertersConfigurer.java 文件中,配置了 Filter,加入了一些序列化的注解,具体为:
七牛 OSS
@QiniuKodo,通过该注解,自动将 Vo 中的七牛云链接转换为 public 的链接或者 private 的链接
    @QiniuKodo(type = BucketType.PRIVATE)      //将imgUrl转化为私有仓库
    private String imgUrl;

    @QiniuKodo(type = BucketType.PUBLIC)       //将imgUrl转化为公有仓库
    private String imgUrl;
阿里 OSS 注解
@AliOss,通过该注解,自动将 Vo 中的阿里云链接转换为 public 的链接或者 private 的链接
    @AliOss(type = BucketType.PRIVATE)      //将imgUrl转化为私有仓库
    private String imgUrl;

    @AliOss(type = BucketType.PUBLIC)       //将imgUrl转化为公有仓库
    private String imgUrl;
腾讯 OSS 注解
@TencentCos,通过该注解,自动将 Vo 中国的腾讯云链接转换为 public 的链接或者 private 的链接
    @TencentCos(type = BucketType.PRIVATE)
    private String imgUrl;

    @TencentCos(type = BucketType.PUBLIC)
    private String imgUrl;
枚举值序列化注解
@DoNotSerialize,通过该注解,可以避免 Qo 和 Vo 序列化,,具体详见问题说明点击查看
	@DoNotSerialize
	@ApiModelProperty(value = "子系统", example = "")
	@NotNull(message = "subSys不能为null")
	private transient SubSysEnum subSys;
脱敏注解
@Desensitization,可以将手机号、身份证号进行脱敏,例如手机号脱敏为 158****3291,
    @Desensitization(type = DesensitizationType.PHONE)
    private String mobileNumber;

    @Desensitization(type = DesensitizationType.ID_CARD)
    private String id_card_no;
框架的调用建议
Controller、BizService、Service、Manager、Repostory 属于层层递进的关系
- Controller:接收参数(Qo)、进行校验、整理报文并返回(Vo)
- BizService:业务级别的服务,例如支付订单成功,需要修改订单状态、下发下单短信、通知物流发货...,那么可以封装一个业务 Service,即 BizService
- Service:业务服务,例如订单服务、用户服务等
- Manager:单表的管理
- Repository:单表的 CRUD
可以现在一些项目进行参考
系统安全
一般重要项目都有安全等级要求,确保安全是一个套路,按如下操作基本搞定 99%。
应用安全
客观来说,我们能够保障的就是应用层面的安全,通过接口加密可以搞定 99%
接口加密
接口加密是重要的防渗透的方案,一旦接口被加密,大大的提升了接口安全性,哪怕接口有越权等漏洞,那也得破掉加密才可以利用,一般安全团队搞不定
接口加密可以参考禁毒项目,Java 框架必须在 3.0.12 以上,在 yml 中,配置 cryto 配置项即可,采用 AES 加密:
- desSecretKey、desIv 需要和前端同步,AES 加密所需秘钥和偏移量
- force:是否加密,我们的建议是测试环境不加密,便于调试;生产环境加密,提升安全性。即 application-dev.yml 的 force=false,application-prod.yml 的 force=true
- timeCheck:时间戳校验,为了防止报文被反复使用,增加了时间戳校验,前端发送报文时加入 timestamp,提升了参数的随机性,超过 30 秒的报文,意味着超时,进一步提升安全性 -excludeRoutes:不要加密控制的接口
#通信body加解密
crypto:
  desSecretKey: b2c17b46e2b1415392aab5a82869856c
  desIv: 61960842
  force: true
  timeCheck: false
  excludeRoutes:
    - /**/no-need-to-crypt
接口加密前端代码
后端通过一个配置文件,就在框架中搞定了加密,那么前端调用接口时,也提供了加密工具
- WebConsole 的加密工具
这些工具都是延续下来的,可能有点封装冗余,但是好用,如有问题请 call TerryQi
- aes 工具,aes.ts
- 封装接口加解密工具,encryption.ts
在请求拦截器和响应拦截器中使用加解密控制
- 请求拦截器
axios.interceptors.request.use(
  (config: AxiosRequestConfig) => {
    // let each request carry token
    // this example using the JWT token
    // Authorization is a custom headers key
    // please modify it according to the actual situation
    const token = getToken();
    if (token) {
      if (!config.headers) {
        config.headers = {};
      }
      config.headers.Authorization = `Bearer ${token}`;
    }
    if (ENCRYPTION === "true") {
      config.data = requestEntrance(config.data); //进行数据加密
    }
    return config;
  },
  (error) => {
    // do something
    return Promise.reject(error);
  }
);
- 响应拦截器
axios.interceptors.response.use(
  (response: AxiosResponse<HttpResponse>) => {
    let res = response.data;
    if (ENCRYPTION === 'true') {
      res = <HttpResponse>responseEntrance(res);
    }
    // if the custom code is not 20000, it is judged as an error.
    if (res.code !== 200) {
      Message.error({
        content: res.message || 'Error',
        duration: 5 * 1000,
      });
      // 50008: Illegal token; 50012: Other clients logged in; 50014: Token expired;
      if (
        [50008, 50012, 50014].includes(res.code) &&
        response.config.url !== '/api/user/info'
      ) {
        Modal.error({
          title: 'Confirm logout',
          content:
            'You have been logged out, you can cancel to stay on this page, or log in again',
          okText: 'Re-Login',
          async onOk() {
            const userStore = useUserStore();

            await userStore.logout();
            window.location.reload();
          },
        });
      }
      return Promise.reject(new Error(res.message || 'Error'));
    }
    return res;
  },
  (error) => {
    Message.error({
      content: error.msg || 'Request Error',
      duration: 5 * 1000,
    });
    return Promise.reject(error);
  }
);
前端配置文件
# 加密相关
VITE_APP_ENCRYPTION = true
VITE_APP_AES_KEY = 'b2c17b46e2b1415392aab5a82869856c'
VITE_APP_AES_IV = '61960842'
接口加密 Uniapp 代码
- 提供 aes_app 加密工具,aes_app.js
import { aesEncrypt } from "./aes_app";

// 请求拦截器中
if (setting.cryptFlag) {
  config = aesEncrypt(config);
}

//响应拦截器中
if (setting.cryptFlag) {
  data = aesDecrypt(response).data;
}
再进一步
客观来说,上面的接口加密基本搞定 99%的问题,但我们可以做的更好一些,那么在 sys_account_auth 中,存储着用户的鉴权信息,包括:
- token:用户的唯一标识
- secretKey、secretValue:个性化的秘钥
那么,我们可以登陆接口用同一加密秘钥,但是其他接口使用用户个性的秘钥,这样基本不存在秘钥泄露的问题。
因为一般前端最多只是混淆代码,是做不了代码加密的,如果你的业务很有价值,攻击人员可以在混淆的前端代码中拿到公共的秘钥,进而伪造报文——通过个性化的秘钥,又进一步提升了安全性。
数据安全
在一些场景,需要对数据库的数据进行加密,例如用户的姓名、手机号、身份证号和银行卡号信息,统称为人员的信息"四要素",那么当两个以上的信息同时存在时,就要考虑信息安全问题。 当然,这个与项目要求有关系,有些项目涉及到了较多的用户个人信息,那么就要考虑处理信息安全问题。
数据脱敏
信息安全问题不光是技术问题,也是产品问题,例如在非必要展示信息时,用户的身份证号应该是211004********03013,手机号应该是 131****4543,展示是进行脱敏。
那么可以用框架中自带的脱敏注解,在 Vo 中加入即可,这样就可以将全部的返回报文进行脱敏了。
数据加密
所谓数据加密,是在数据库中,不再明文存储信息,防止由于数据泄露导致用户的个人隐私泄露。
在 Entity 中,增加了 @Convert(converter = CryptoAttributeConverter.class) 注解,确保数据在数据库中是加密的。那么加密的影响是:
- 在检索数据时,必须全部匹配才可以了,不能进行模糊匹配,也就是不能用
字段_Like的检索条件 - 其余 JPA 中的封装的检索方法都是 ok 的
    /**
     * 微信号
     */
    @Column(name = "wx_num")
    @Convert(converter = CryptoAttributeConverter.class)
    private String wxNum;
文件加密
部分应用会存储用户的照片和身份证信息,那么:
- 文件名要无规律,即不允许通过用户 id、身份证号等信息来命名图片,图片名必须是无规则的名称,在 CommonUtil 中有工具
- 图片一般存储在 OSS 中,OSS 中基本都有私有桶,提供文件临时访问的私有链接,进一步提升安全性,框架中针对主流 OSS 已经封装
基础架构安全
我们在项目开发中,使用很多的中间件和工具,例如 Jenkins、Nacos、Mysql、Redis、ES、xxl-job 等
一个基本概念,这些中间件都需要设定密码访问,并且端口要禁用,不允许外部访问,即:
- 生产环境必做网路策略,对外只开放 80 和 443(all source ip)
- 为了便于连生产排查问题,上 VPN 或者入访控制,公司有固定公网 IP 地址,例如 3306(Mysql)、6370(Redis)、22(SSH)等仅对公司的公网 IP 开放准入
- 例如 Swagger 在配置文件中设定 show=false,生产环境无法访问
总结
安全是一种思想意识,不同的系统要求不同的安全等级,在实施项目的过程中,要有意识的提升系统安全性。通过以上手段,基本 Cover 住全部的安全问题,如果有你有搞不定的问题、或者有更好的想法,请 call TerryQi。
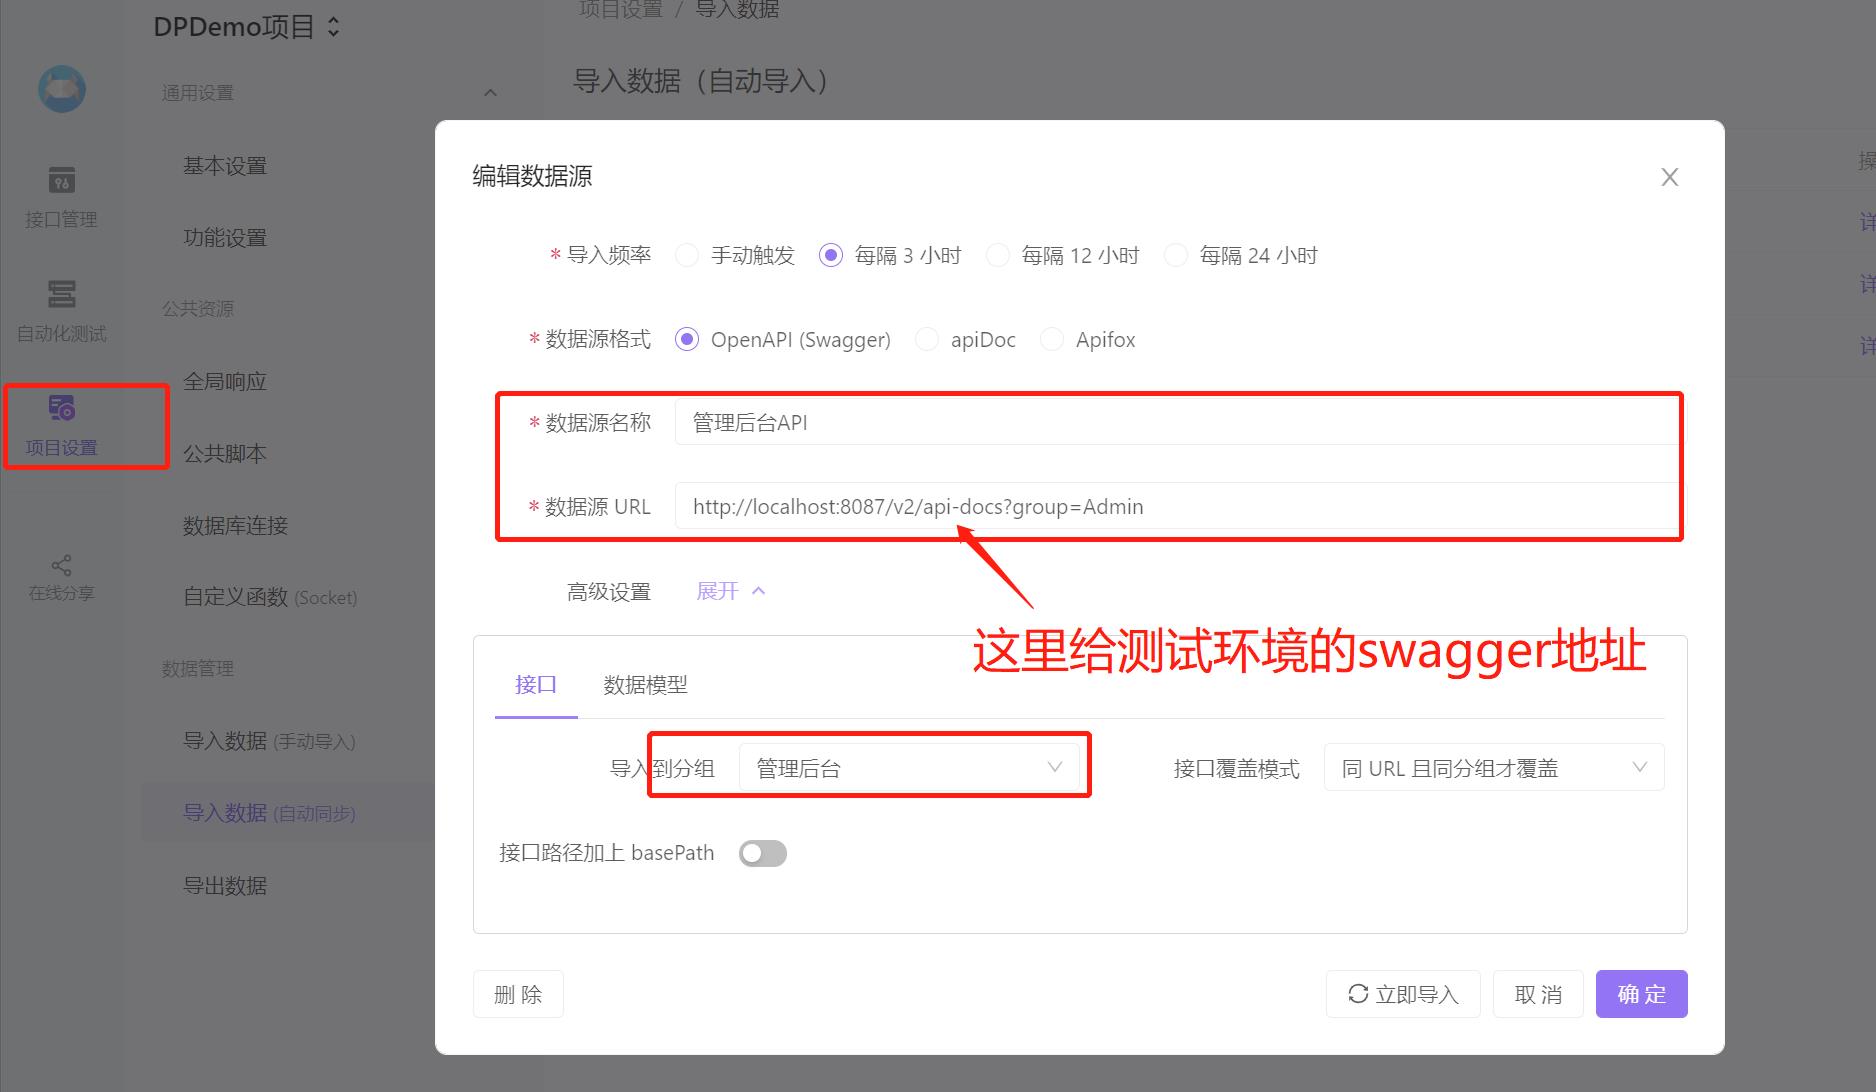
如何管理接口
开发框架采用 swagger 结合 ApiFox 结合来进行接口管理,为什么这么选择?通用性强,集中进行接口管理
一般情况下,只要 copy 历史项目的配置即可
请后端人员下载 apifox,统一进行接口调试和管理
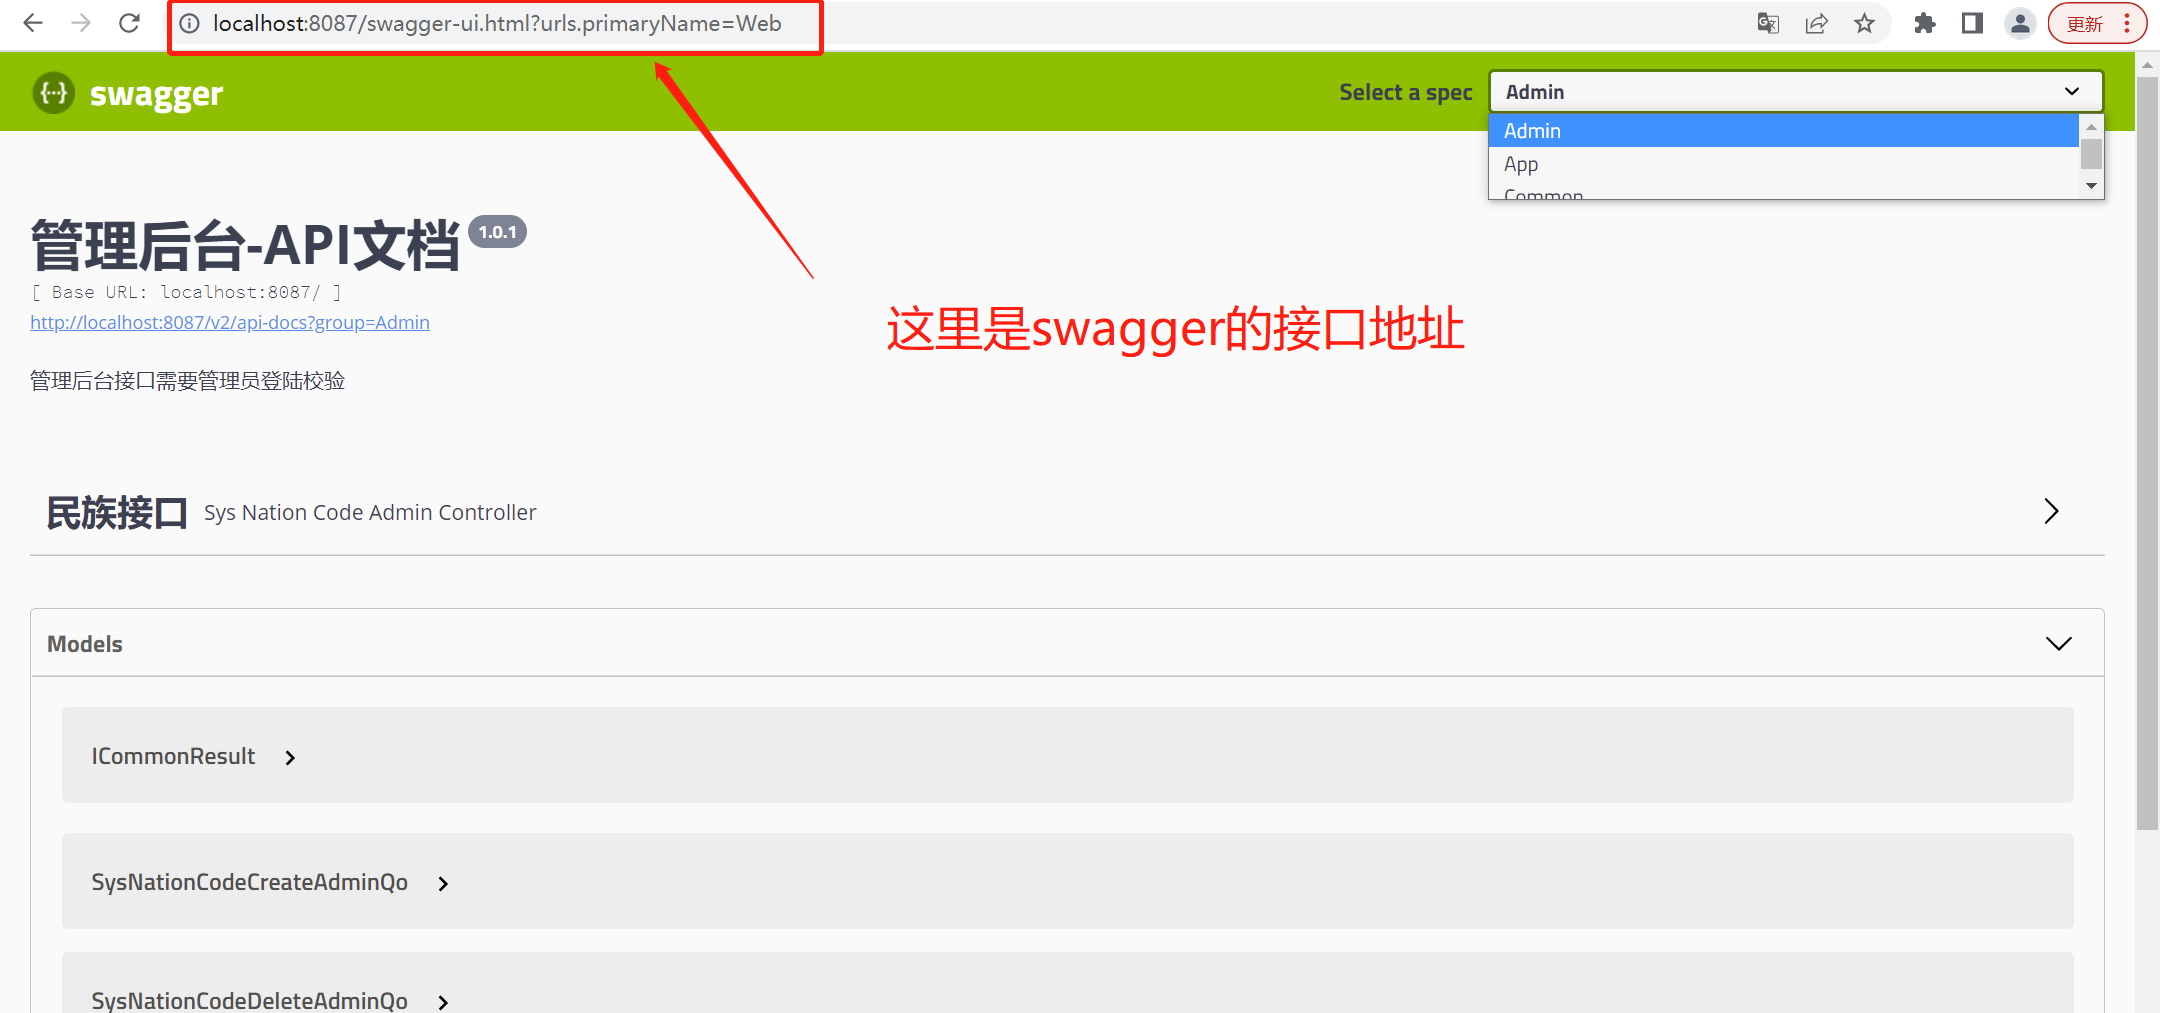
Swagger 接口服务
使用 swagger 进行接口,在应用 swagger 配置
swagger:
  show: false           //生产环境中不展示swagger
在应用中进行接口配置,在 swagger 包中进行接口管理,其中我们基本的定义是:
- /api/admin:管理后台接口,一般有 token 校验
- /api/common:通用接口,一般不需要 token 校验
- /api/app:应用接口,例如给小程序、Web、App 的接口放在这里
PS:2023-08-14 进行了优化,因为发现 implements WebMvcConfigure 更好一些,之前使用 WebMvcConfigurationSupport 只能生效一次,是不推荐的
package com.isart.art.base.swagger;

import com.google.common.base.Predicates;
import org.springframework.beans.factory.annotation.Value;
import org.springframework.context.annotation.Bean;
import org.springframework.context.annotation.Configuration;
import org.springframework.web.servlet.config.annotation.ResourceHandlerRegistry;
import org.springframework.web.servlet.config.annotation.WebMvcConfigurer;
import springfox.documentation.builders.ApiInfoBuilder;
import springfox.documentation.builders.PathSelectors;
import springfox.documentation.builders.RequestHandlerSelectors;
import springfox.documentation.service.ApiInfo;
import springfox.documentation.spi.DocumentationType;
import springfox.documentation.spring.web.plugins.Docket;
import springfox.documentation.swagger2.annotations.EnableSwagger2;

/**
 * @author TerryQi
 * @since 2022/7/17 16:54
 */
@Configuration
@EnableSwagger2
public class SwaggerConfiguration implements WebMvcConfigurer {

    @Value("${swagger.show}")
    private boolean show;

    /**
     * 接口文檔的版本
     */
    private final String VERSION = "1.0.1";

    @Override
    public void addResourceHandlers(ResourceHandlerRegistry registry) {
        registry.addResourceHandler("doc.html")
                .addResourceLocations("classpath:/META-INF/resources/");

        registry.addResourceHandler("swagger-ui.html")
                .addResourceLocations("classpath:/META-INF/resources/");
        registry.addResourceHandler("/webjars/**")
                .addResourceLocations("classpath:/META-INF/resources/webjars/");
    }

    /**
     * 管理后台的接口
     */
    @Bean
    public Docket adminConfig() {
        return new Docket(DocumentationType.SWAGGER_2)
                .select()
                .apis(RequestHandlerSelectors.any())
                //不显示错误的接口地址
                .paths(Predicates.not(PathSelectors.regex("/error.*")))//错误路径不监控
                .paths(PathSelectors.regex("/api/admin/.*"))// 对根下所有路径进行监控
                .paths(PathSelectors.any())
                .build()
                .apiInfo(adminInfo())
                .groupName("Admin")
                .enable(show);
    }

    private ApiInfo adminInfo() {
        return new ApiInfoBuilder()
                .title("管理后台-API文档")
                .description("管理后台接口")
                .version(VERSION) //版本号
                .build();
    }


    @Bean
    public Docket commonConfig() {
        return new Docket(DocumentationType.SWAGGER_2)
                .select()
                .apis(RequestHandlerSelectors.any())
                //不显示错误的接口地址
                .paths(Predicates.not(PathSelectors.regex("/error.*")))//错误路径不监控
                .paths(PathSelectors.regex("/api/common/.*"))// 对根下所有路径进行监控
                .paths(PathSelectors.any())
                .build()
                .apiInfo(commonInfo())
                .groupName("Common")
                .enable(show);
    }

    private ApiInfo commonInfo() {
        return new ApiInfoBuilder()
                .title("通用-API文档")
                .description("通用接口")
                .version(VERSION) //版本号
                .build();
    }


    @Bean
    public Docket providerConfig() {
        return new Docket(DocumentationType.SWAGGER_2)
                .select()
                .apis(RequestHandlerSelectors.any())
                //不显示错误的接口地址
                .paths(Predicates.not(PathSelectors.regex("/error.*")))//错误路径不监控
                .paths(PathSelectors.regex("/provider/.*"))// 对根下所有路径进行监控
                .paths(PathSelectors.any())
                .build()
                .apiInfo(providerInfo())
                .groupName("Provider")
                .enable(show);
    }

    private ApiInfo providerInfo() {
        return new ApiInfoBuilder()
                .title("Provider-接口文档")
                .description("Provider接口")
                .version(VERSION) //版本号
                .build();
    }

}
Swagger 接口地址
默认 swagger 的访问地址是http://localhost:8087/swagger-ui.html,如果使用提供的 swagger 配置,则有 Admin、App、Common 三个分组
ApiFox 管理接口
创建项目,在项目下新建 管理后台、通用接口、APP 接口,将 Swagger 的接口配置进入,手动导入(可以配置 3 个小时一同步),咻一下接口文档生成了
接口参数校验
项目中使用 spring validation 来进行参数校验,其中 Validate 的校验注解不再赘述
在 Controller 的形态,自动生成的 Controller 都已经添加
@RestController
@Slf4j
@Validated
@Api(tags = {"市场价格"}, value = "市场价格接口")
@RequestMapping("/api/common/product")
public class CfProductCommonController {

    @Resource
    private UserUtil userUtil;

    @Resource
    private CfProductManager productManager;

    @ApiOperation(value = "获取市场价格(不分页)", response = CfProductListVo.class)
    @RequestMapping(value = "/list", method = RequestMethod.POST)
    public ICommonResult list(@Valid @RequestBody CfProductQueryQo request) {
特殊说明的是,如果需要层级校验(即 Qo 里面还嵌套了 Qo),则在嵌套对象上增加@Valid 注解即可
/**
 * @author TerryQi
 * @since 2022/8/13 16:56
 */
@Data
public class SupplierQuoteSignUpQo implements IBaseQo {

    @ApiModelProperty(value = "采购子任务id", example = "")
    @NotNull(message = "ID不能为空!")
    private Integer purchaseSubTaskId;

    @ApiModelProperty(value = "报价明细", example = "")
    @NotEmpty(message = "报价明细不能为空!")
    @Valid
    private List<QuoteSummaryDo> quoteSummaryList;

}
参数校验异常接收
目前封装再 developer-web 框架中的异常统一拦截器中
    @org.springframework.web.bind.annotation.ExceptionHandler(MethodArgumentNotValidException.class)
    @ResponseBody
    public CommonObjectResult<String> handleMethodArgumentNotValidException(MethodArgumentNotValidException e) {
        log.error("参数校验异常,message:{}", e.getMessage());
        e.printStackTrace();
        StringBuilder sb = new StringBuilder();
        List<ObjectError> allErrors = e.getBindingResult().getAllErrors();
        String message = allErrors.stream().map(s -> s.getDefaultMessage()).collect(Collectors.joining(";"));
        return new CommonObjectResult<>(BizException.PARAMS_ERROR, message);
    }
在 Controller 中接口的@RequestBody 前面加@Valid 注解即可,例如
    @ApiOperation(value = "创建卡卷", response = BizCardVo.class)
    @RequestMapping(value = "/create", method = RequestMethod.POST)
    public ICommonResult create(@Valid @RequestBody BizCardCreateQo request) {

        BizCardEntity entity = BeanUtil.copyProperties(request, BizCardEntity.class);
        entity.setLeftNum(entity.getTotalNum());
        cardManager.save(entity);
        BizCardVo vo = BeanUtil.copyProperties(entity, BizCardVo.class);

        return new CommonObjectResult<>(vo);
    }
配置文件
本地配置
很多情况下,我们需要针对开发环境和生产环境做一些区分的配置,例如:
- 在下发验证码时,本地开发环境/测试环境不下发验证码,验证码默认为 0000;生产环境才真实下发验证码
那么我们建议的配置方案是
- 在项目中,建立 config 包,里面有 LocalConfig 类
在 yml 文件中
#本地环境配置
local:
  evn: dev   #环境信息,prod、dev等,主要控制验证码下发,例如dev环境,验证码就是0000,不真正下发
@Component
@Data
public class LocalConfig {

    //本地环境配置
    @Value("${local.env}")
    public String env = "dev"; //默认是ENV环境

    public final String ENV_DEV = "dev";
    public final String ENV_PROD = "prod";

}
- 在各处引用时,使用 LocalConfig,具体详见验证码下发 Service
public boolean sendVerifyCode(SendVerifyCodeDo sendVerifyCodeDo) {

        boolean result = false;
        SysVerifyCodeEntity verifyCodeEntity = new SysVerifyCodeEntity();
        verifyCodeEntity.setPhoneNumber(sendVerifyCodeDo.getPhoneNumber());
        String code = RandomStringUtils.random(4, false, true);
        //开发环境下,全部的验证码都是0000
        if (localConfig.env.equals(localConfig.ENV_DEV)) {
            code = "0000";
            result = true;
        } else {
            try {
                result = smsService.sendSmsCode(sendVerifyCodeDo.getPhoneNumber(), code);
            } catch (ClientException e) {
                log.error("", e);
            }
        }
        if (result) {
            verifyCodeEntity.setCode(code);
            verifyCodeManager.save(verifyCodeEntity);
        }
        return result;
    }
PS:为什么不选择使用 spring.profile.active 的配置呢? 因为很多情况下,我们本地/开发环境也要模拟生产,所以另外设置了 local.env 这个配置变量,好处就是可控,这仅仅是我们团队的理解和规范
关于枚举的序列化处理
在 yml 文件中,进行如下配置,可以实现对于枚举的序列化处理
请注意,在 3.0.6 版本之后已经不再建议对枚举值进行序列化处理了,建议上是对 enum-convertor 处理一下,直接返回 code 值,这样主要是前端 get 到报文后,直接可以 edit 回来,否则存在问题
# 请求响应过滤器
http-convertor:
  enum-convertor: true #是否开启枚举转换,默认枚举转化是开启的
  exclude-urls: #不进行转换的url列表,即虽然enum-convertor是true
    - /provider/** #通过startWith来匹配
接口报文不进行 Qo 映射
目前,我们的框架中,会将全部的 Post 请求 body 中的 json 转化为 Qo 对象,以便于 Controller 中的操作。但是部分场景下,是不能进行请求的对象转化的。例如:微信支付回调通知,微信请求的报文为 xml 格式,因此使用 fastjson 进行 parseObject 时将报错
怎么办?应该针对某些接口,不适用 fastjson 进行 Qo 对象的映射,新增配置项
exclude-urls:是一个数组,哪些接口不希望使用 fastjson 进行 Qo 对象的映射,就把哪些接口放进来
# 不进行body的json化
body-json:
  exclude-urls: #不进行转换的url列表,即虽然enum-convertor是true
    - /api/common/payNotify/wxPay #通过startWith来匹配
例如微信支付通知接口
    @SneakyThrows
    @ApiOperation(value = "微信支付回调", response = ActivityWorkWithFavorVo.class)
    @RequestMapping(value = "/wxPay", method = RequestMethod.POST)
    public String wxPay(@RequestBody String xmlData) {

        WxPayOrderNotifyResult notifyResult = this.wxPayService.parseOrderNotifyResult(xmlData);

        String outTradeNo = notifyResult.getOutTradeNo();
        BmsPayOrderEntity orderEntity = payOrderManager.findByTradeNo(outTradeNo);
        if (orderEntity != null) {
            PayNotifyDo payNotifyDo = new PayNotifyDo();
            payNotifyDo.setTradeNo(outTradeNo);
            payOrderService.payNotify(payNotifyDo);
        }
        return WxPayNotifyResponse.success("成功");
    }
关于日志
项目通过 logback 进行日志管理,主要有 3 个优化点:
- 日志的 traceId 不重复
在日志配置文件中,通过 MDC 配置上下文参数,在 TokenAuthenticationFilter 过滤器中,设置了 traceId
    @Override
    protected void doFilterInternal(HttpServletRequest request, HttpServletResponse response, FilterChain filterChain)
            throws ServletException, IOException {

        MDC.put(TRACE_ID, UUID.randomUUID().toString());

        log.info("request path:{},query str:{},form:{}", request.getRequestURI(), request.getQueryString(), JSON.toJSONString(request.getParameterMap()));

    ...
    }

    @Override
    public void destroy() {
        MDC.clear();
    }
在 logback.xml 中,原生成 traceId 的方法不再采用,使用[%X{TRACE_ID}]的方式来获取 traceId
    <property name="CONSOLE_LOG_PATTERN"
              value="%d{yyyy-MM-dd HH:mm:ss} [%X{TRACE_ID}] -%clr(%-5level) %logger{26} - %msg%n"/>
    <property name="File_LOG_PATTERN" value="%d{yyyy-MM-dd HH:mm:ss} [%X{TRACE_ID}] %-5level %logger{26} - %msg%n"/>
2.打印完整 sql,且分析 sql 的执行时长
客观来说,以往开启 show-sql 没有什么意义,因为没有执行参数,所以无法了解具体代码的执行过程,本次使用 log4jdbc-log4j2-jdbc4.1 作为 mysql 的数据库连接池驱动,完善了打印 sql
- pom.xml 文件,引入 log4jdbc-log4j2-jdbc4.1
        <!--SQL 日志管理-->
        <dependency>
            <groupId>org.bgee.log4jdbc-log4j2</groupId>
            <artifactId>log4jdbc-log4j2-jdbc4.1</artifactId>
            <version>1.16</version>
        </dependency>
- application-dev.yml 文件配置数据库链接和驱动,请注意 url 和 driver-class-name
spring:
  datasource:
    url: jdbc:log4jdbc:mysql://140.143.236.86:3306/ytcfdb?useUnicode=true&characterEncoding=utf8&serverTimezone=Asia/Shanghai&rewriteBatchedStatements=true
    username: ytcfdb
    password: xG2LHb2sABshKFtt
    driver-class-name: net.sf.log4jdbc.sql.jdbcapi.DriverSpy
- 增加 log4jdbc.log4j2.properties 文件
# If you use SLF4J. First, you need to tell log4jdbc-log4j2 that you want to use the SLF4J logger
log4jdbc.spylogdelegator.name=net.sf.log4jdbc.log.slf4j.Slf4jSpyLogDelegator
- 日志保存在 jar 包同级目录下,./log 文件中,一般情况巡查 web_error.log,发现问题后到 web_info.log 根据 traceId 查询更进一步信息,请求参数的打印在加解密的 Advice 中实现
在框架中,CryptoRequestBodyAdvice.java、CryptoResponseBodyAdvice.java 为请求和响应的拦截器
怎么查看日志?
首先,日志的巡检非常重要,很多情况下是我们排查问题的关键,那么日志目前都存放在./logs 目录下
以碧桂园项目为例,我们项目通过 jenkins 部署,bgy 部署的路径是/home/app/services/bgy,日志在./logs 文件夹下
[root@VM-0-16-centos bgy]# pwd
/home/app/services/bgy
[root@VM-0-16-centos bgy]# ls -la
total 80120
drwxrwxrwx 4 root root     4096 Jul 29 10:44 .
drwxrwxrwx 6 app  app      4096 Aug 12 23:50 ..
-rwxrwxrwx 1 app  app  81960162 Aug 31 20:07 bgy-application-3.0.0.jar
drwxrwxr-x 3 app  app      4096 Jul 29 10:44 d:\
drwxrwxrwx 3 app  app      4096 Aug  1 15:14 logs
-rwxrwxrwx 1 app  app     49356 Aug 31 23:52 output
-rwxrwxrwx 1 root root      248 Jul 23 17:36 run.sh
[root@VM-0-16-centos bgy]#
- web_debug.log:调试级别日志
- web_info.log:info 级日志
- web_error.log: 错误日志
[root@VM-0-16-centos bgy]# cd logs/
[root@VM-0-16-centos logs]# ls
2022-07  web_debug.log  web_error.log  web_info.log
可以 tail -f -n 100 web_error.log 查看日志,注意:在 3.0.2 版本框架中,对日志的流水号进行了升级(Guide)[/java/Guide]
其中1b813238e895426090a10280e109fd01为流水号
17:55:25 [1b813238e895426090a10280e109fd01] ERROR c.q.d.w.c.ExceptionHandler - 数据访问异常,message:query did not return a unique result: 88; nested exception is javax.persistence.NonUniqueResultException: query did not return a unique result: 88
在 web_info 中可以检索更多的上下文信息
tail -f -n 10000 web_info.log | grep "1b813238e895426090a10280e109fd01"


18:12:06 [1b813238e895426090a10280e109fd01] INFO  c.i.b.s.TokenAuthenticationFilter - request path:/api/app/ad/list,query str:null,form:{}
18:12:06 [1b813238e895426090a10280e109fd01] INFO  c.i.b.s.TokenAuthenticationFilter - token:96eab904639c40b8957b54aacfa9e338
18:12:06 [1b813238e895426090a10280e109fd01] INFO  c.i.b.s.TokenAuthenticationFilter - current user:{"accountNonExpired":true,"accountNonLocked":true,"authorities":[],"avatar":"https://thirdwx.qlogo.cn/mmopen/vi_32/cUbPnFTebbQwytQibib5gwo2tO45qFSyBiaLlaibZ84wibpD8eQojS5ibqibOgadQ7Ny3OziakBiaicYO3zI5Fice1YBHNpag/132","communityId":65,"credentialsNonExpired":true,"enabled":true,"gender":"UNKNOWN","nickName":"O.Ohuang","phoneNumber":"13555883891","realName":"黄伟","roleList":[],"status":"1","token":"96eab904639c40b8957b54aacfa9e338","userId":127,"username":"黄伟","uuid":"2e8d8b4543664e99abafa30a06e63118"}
18:12:06 [1b813238e895426090a10280e109fd01] INFO  c.q.d.w.s.CryptoRequestBodyAdvice - [REQUEST], path : /api/app/ad/list, Body : {"size":20,"page":0,"communityId":65,"status":"1"}
18:12:06 [1b813238e895426090a10280e109fd01] INFO  c.q.d.w.s.CryptoResponseBodyAdvice - [RESPONSE], time : 4, Body : {"code":200,"message":"success","result":[{"adId":15,"communityId":65,"createdAt":"2022-08-25 15:19:03","createdBy":126,"gameId":1,"img":"http://bgyyx.public.isart.me/bgyyx/202208/1661411938925.webp","sort":1,"status":"1","title":"11","version":0},{"adId":16,"communityId":65,"createdAt":"2022-08-25 15:19:15","createdBy":126,"gameId":1,"img":"http://bgyyx.public.isart.me/bgyyx/202208/1661411950733.jpg","sort":2,"status":"1","title":"222","version":0},{"adId":17,"communityId":65,"createdAt":"2022-08-25 15:19:26","createdBy":126,"gameId":1,"img":"http://bgyyx.public.isart.me/bgyyx/202208/1661411961585.jpg","sort":4,"status":"1","title":"333","version":0},{"adId":18,"communityId":65,"createdAt":"2022-08-25 15:19:42","createdBy":126,"gameId":1,"img":"http://bgyyx.public.isart.me/bgyyx/202208/1661411977086.jpg","sort":66,"status":"1","title":"555","version":0}]}
如何提升批量插入/更新效率
首先 JPA 有批量操作管理,但是要求表的 ID 定义不能为GenerationType.IDENTITY,我们当前的规范不能满足,那么有一个思路是进行多线程的操作,那么操作时有前提:
- 不能加入事务
- 只适合于单表操作
- 业务不能有耦合,不能对插入顺序有要求
在电商助手的选品管理功能中,最后要批量向表中插入 2000 条数据,业务比较独立,最终通过多线程的办法将插入效率提升了 近 100 倍,多线程插入数据的性能瓶颈在 DB
/**
     * 通过多线程方式,批量保存数据
     *
     * @param entityList
     */
    private void batchSaveSkuFiltSelection(List<PmsSkuFiltSelectionEntity> entityList) {

        Integer threadCount = 100;

        // 截断表,经过与学哥的沟通,每次只保留一套数据即可
        skuFiltSelectionManager.truncateTable();

        LocalDateTime time1 = LocalDateTime.now();

        ThreadPoolExecutor threadPool = new ThreadPoolExecutor(20, threadCount
                , 4, TimeUnit.SECONDS, new ArrayBlockingQueue<>(10), new ThreadPoolExecutor.AbortPolicy());

        List<List<PmsSkuFiltSelectionEntity>> splitList = ListUtils.splitList(entityList, threadCount);

        // 记录单个任务的执行次数
        CountDownLatch countDownLatch = new CountDownLatch(splitList.size());
        for (List<PmsSkuFiltSelectionEntity> singleList : splitList) {
            // 线程池执行
            threadPool.execute(new Thread(() -> {
                skuFiltSelectionManager.saveAll(singleList);
                countDownLatch.countDown();
            }));
        }
        try {
            countDownLatch.await();
        } catch (InterruptedException e) {
            e.printStackTrace();
        }
        LocalDateTime time2 = LocalDateTime.now();

        Duration duration = Duration.between(time1, time2);
        log.info("保存数据耗时:{}秒", duration.getSeconds());

    }
其中 ListUtils 在电商助手项目中存在
Truncate 表
有时候需要 Truncate 表时,应该在 repository 中编写原生语句,truncate 表的效率比较高,适合于清空表的场景
    @Transactional
    @Modifying
    @Query(value = "truncate table `pms_sku_filt_selection`", nativeQuery = true)
    public void truncateTable();